
 I happened to be happy when I found this recipe in Jesse Oleson Moore’s because so many bakers overlook prepared icing and aim for cream-cheese frosting. Today, you could love red velvet cake with cream-cheese frosting – and even believe that it is the initial pairing – but offer this one an attempt, which some proponents say is the icing that's designed to crown your purple velvet cake.
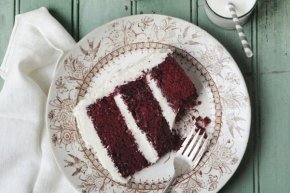
Adjusted from the trick everyday lives of Baked Goods(Sasquatch Books) by Jesse Oleson Moore. Images by Clare Barboza.
This will be a traditional purple velvet cake, large and beautiful. I’ve made some changes: the meal demands butter rather than oil or shortening, that we believe provides a richer flavor, and the meals coloring? Yes, it is there, and there’s a great deal. It’s up to you simply how much to use—depends on whether you want a cake that whispers or one which shouts.
Creator: Jesse Oleson Moore
- ½ glass (1 stick) unsalted butter, softened
- 1½ cups sugar
- 2 big eggs
- About 2 tablespoons red meals color
- 2 heaping tablespoons unsweetened cocoa dust
- 2¼ glasses dessert flour
- 1 cup buttermilk
- 1 tsp sodium
- 1 teaspoon vanilla extract
- 1 tsp baking soft drink
- 1 tsp white vinegar
- 1 cup dairy
- ¼ glass all-purpose flour
- 1 glass (2 sticks) unsalted butter, softened
- ¾ cup granulated sugar
- Pinch of salt
- Recommended garnish: chocolate shavings, sprinkles or purple sweets
- Position a rack in the exact middle of the oven; preheat the range to 350°F.
- Grease and flour the bottoms and sides of three, 8-inch round cake pans.
- Inside bowl of a stand mixer fitted utilizing the paddle accessory, ointment the butter and sugar on medium speed until light and fluffy, 3 to 5 moments. Add the eggs, individually, pausing to clean along the sides of the bowl with a rubber spatula after each and every inclusion.
- In a tiny bowl, make a paste of the meals coloring and cocoa. Include this paste into the butter mixture, beating on reduced speed so that you do not deliver drops of red coloring every-where! Include the flour alternatively using the buttermilk, making sure each inclusion is totally blended in before including another. Clean down the sides of dish with a rubber spatula after every addition. Stir in salt and vanilla.
- In a separate dish, combine the cooking soda and vinegar (it will fizz up). Instantly blend it into the batter until everything is combined. Divide the batter uniformly between the prepared cake pans; smooth and degree the batter with an offset set or rubberized spatula.
- Bake for 22 to 28 minutes, or until a cake tester placed to the center for the cakes happens mostly clean. Allow desserts cool into the pans for approximately ten minutes; loosen the edges from the cooking pan utilizing a small paring knife, then switch the desserts onto a wire rack. Allow cool totally before frosting.
- For Frosting: Whisk collectively the milk using flour until smooth.
- Transfer to a medium saucepan. Over moderate heat, bring the combination to a-simmer, whisking continuously until it comes to the lowest boil. Remove the cooking pan from stove and move the hot combination into a medium bowl; place plastic place right up against the milk’s area to stop it from developing a skin. Let cool.
- In a stand mixer fitted using paddle attachment, cream the butter, sugar and salt on high speed until really light and fluffy, 3 to 5 minutes. Stir into the vanilla and mix on moderate speed for the next one to two mins.
- Lower mixer speed to reduced and slowly pour the cooled milk mixture into the dish. Raise the rate to large and beat for 5 to 7 mins; during this time period, the frosting becomes smooth and fluffy, which will provide an even more pleasing surface and an even more easily spreadable persistence.
- When it comes to set up: Set one of many layers on a dish with its flattest side up. Spread about one-quarter regarding the icing above, stopping slightly in short supply of the surface edge of the cake. Add another layer of cake, press softly. Put your last dessert at the top and press gently. Frost the edges then the top the cake using the remainder regarding the frosting. If desired, garnish with chocolate shavings, sprinkles or purple sweets.
YOU MIGHT ALSO LIKE

Share this Post
latest post
-
 Coffee Cake Recipes Easy January 20, 2017
 -
 Best Coffee Cake recipe ever April 27, 2016
 -
 Martha Stewart fruit cake recipe May 9, 2016
 -
 Recipe for Cream cheese Cake October 28, 2016
 -
 Red Velvet cake Cheesecake recipe October 12, 2017
 -
 Low Carb Angel Food cake recipe August 4, 2017
 -
 Chocolate Lava Crunch Cake recipe November 9, 2016
 -
 Carrot Cake Jam recipe January 2, 2017
 -
 Best Vanilla sponge cake recipe December 26, 2017